

Gluten-Free Pizza is probably one of the most sought-after dishes in the gluten-free world. It’s so easy to buy a frozen pizza, order delivery, or even buy pre-made pizza dough and bake your own when you can eat gluten. But when you make the transition to gluten-free, freshly made pizza dough is non-existent, and frozen or delivered pizzas are rare, expensive, and not that good. It’s simply impossible to give up pizza, so how can you fill that pizza shaped hole in your heart while still avoid gluten?
Wrangling Gluten-Free Pizza Dough
One of the trickiest problems that gluten-free baking encounters is the dough issue. The thing that makes gluten-based bread products so easy to work with is that mixing even just flour and water creates a substance that’s easy to mold and form into any shape you want, bake it, and it tastes amazing! With gluten-free baking, in order to get the same texture in the final product, it’s rare the “dough” will function in the same way.
Typically gluten-free dough is soft, slightly wet, and requires water and a spatula to shape properly. That means your pizza board might not work so well for this recipe. You’re going to want a large baking sheet with a lip all the way around so that the dough doesn’t flow right off the edges. But the finished product is fluffy, yeasty, with a little bit of chew, and just delicious.
Developing a Gluten-Free Pizza Dough Recipe
This recipe was inspired by an incredible boxed mix for pizza dough by Gluten Free Pantry (which I cannot for the life of me find online so perhaps it’s no longer available in stores). I tried it out after receiving a box for free at the grocery store I used to work at. The recipe made a huge amount of dough, and my friend and I delightedly baked a gigantic pizza, only to be blown away by how delicious the crust was. It was so good that, despite the cost of the box mix alone ringing in at $6, I still bought it every time I wanted pizza.
However, as I looked over the ingredient list, I realized that I had just about all those same ingredients in my kitchen already. Using the weight of the box, the order the ingredients were listed in, my general knowledge of gluten-free baking, and a little math, I worked out a copycat recipe. A few failed attempts later and I had a recipe that tasted almost identical!
Gluten-Free Pizza
Ingredients
- 1.75 C white rice flour
- 1/2 C brown rice flour
- 3/4 C potato starch
- 3/4 C cornstarch
- 2.5 tsp xanthan gum
- 2.25 tsp yeast or 1 packet of yeast
- 1 3/4 C warm milk
- 3 tbsp brown sugar
- 2 tsp salt
- 1 egg
- 3 egg whites lightly beaten
- 2 tsp Apple Cider Vinegar
- 1/3 C vegetable oil
Toppings
- Half jar of pasta sauce
- 12-16 oz grated mozzarella and jack cheese about 2 parts mozzarella to 1 part jack cheese
- 1 can quartered artichoke hearts
- 1 red bell pepper chopped
Important Equipment
- Rimmed baking sheet
- Kitchenaid or hand mixer
- Spatula
Instructions
-
Preheat your oven to the lowest temperature it will register. I use the “warm” setting on mine, and if you have “proof” as an option, that’s even better.
-
Place the milk in a microwave-safe container (such as a pyrex measuring cup), and heat the milk for 1-1:45 minutes, depending on the strength of your microwave. You want the milk to be warm to touch but not hot.
-
Prepare all your dry ingredients in your mixing bowl. Try to keep the yeast and the salt on opposite sides of the bowl.
-
Beat the three egg whites in a separate small container until they are a little frothy. Add the remaining egg, the vegetable oil and apple cider vinegar to the egg whites.
-
Once your milk is warm, set your mixer to a low setting, stirring the dry ingredients, and begin slowly pouring in the egg mixture. Once done, quickly switch to gradually adding the milk.
-
Once the milk is added and slightly incorporated, stop the mixer, scrape down the sides of the bowl and restart the mixing at a slightly higher speed until the dough is uniform in texture. The “dough” will be very silky and thick, close to muffin batter texture.
-
Turn the mixer up to a medium-high speed and beat on medium high for three minutes. This helps activate the xanthan gum, sort of like kneading develops gluten.
-
Lightly grease your rimmed cookie sheet. Fill a container with warm water to dip your spatula in. Scrape all of the dough out of the mixing bowl onto the baking sheet.
-
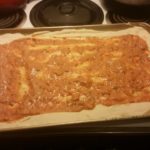
Begin spreading the dough out into the corners of the sheet. I find using a technique similar to frosting a cake works well, where you’re not scraping the bottom but trying to always have a cushion of dough between you and the baking sheet at all times. You don’t want any see-through spots. Dip the spatula in the water occasionally to prevent the dough from sticking to it as you spread.
-
Once the dough is spread into all the corners and relatively even and flat, push the dough to the sides of the baking sheet so that there is a small ridge around the edge of the pizza. You can define this edge by using your spatula to draw a line about 3/4 inch from the outside edge of the dough. Don’t worry about making it perfect. Irregularity looks delicious once it’s been baked through.
-
Place your pizza dough in the warm oven or proofer for 20-minutes to rise.
-
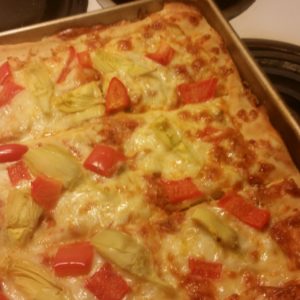
Prepare your toppings. I’ve suggested mozzarella, jack cheese, red bell pepper and artichoke hearts, but you can use whatever toppings you like!
-
After 20 minutes, take the risen pizza dough out of the oven, and set the oven to preheat at 450 degrees.
-
Add a thin layer of sauce evenly across the pizza, leaving the ridge around the edge clear of sauce. You don’t want too much sauce because too much liquid on a gluten-free pizza will make things soggy. Add the rest of your toppings however you like them. I like a very generous layer of cheese in the center and just a little bit of cheese around the edge that will turn crispy and wonderful in the oven, before adding the other toppings.
-
Bake at 450 degrees for 13-15 minutes. The crust should be golden brown and the cheese should be bubbling and starting to brown. Cut into squares and enjoy!


This pizza reheats fairly well. It loses a little bit of texture in the microwave but is still plenty delicious, and it stays good for about a week after baking if wrapped up well. I’m interested in trying to half this recipe and put it in a standard round pizza pan instead.
I hope you enjoy this gluten-free pizza recipe! Be sure to let me know how yours turns out and what toppings you used!