How to Make Gluten-Free Blackberry Pie

A friend of mine asked for a recipe for gluten-free pie crust so that he could make a pie that I could eat. When he served me the first slice he said, “When was the last time you had a gluten-free pie?” I said, “Er, probably 6 months ago?” He said, “When was the last time you had gluten free pie made someone other than you?” I paused and then said, “Never!”

I can count on one hand the number of times someone has made a pie I could eat since then! I didn’t nail down my ideal pie crust recipe for few years and now I use it for any pie, tart, or quiche that I make and it’s always a hit. It’s buttery and tender and your friends really won’t believe you when you tell them it’s gluten-free.

In this recipe, I’ll teach you how to make the basic pie crust, and then a classic Blackberry filling to make use of it. The following makes enough pie dough for a top and a bottom crust for one 9-inch pie pan.

Gluten-Free Blackberry Pie

Searching for a gluten-free pie crust that doesn't crumble or taste like cardboard? Want a classic recipe to show off your gluten-free skills? Search no further!
Course Dessert
Prep Time 30 minutes
Passive time 1 hour
Servings 8 people

Ingredients

Crust Ingredients

  • ¾ C butter
  • ¾ C white rice flour
  • ½ C brown rice flour
  • ½ C tapioca starch
  • ¼ C potato starch
  • 2 tsp xanthan gum
  • ½ tsp baking powder
  • ¼ C sugar
  • ½ tsp salt
  • 1 tbsp vinegar
  • 1 egg

Filling Ingredients

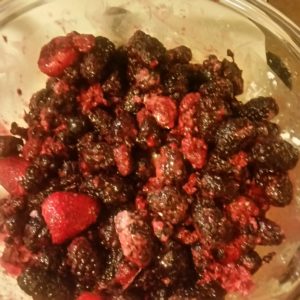
  • 4 C frozen blackberries about two 1-lb packages
  • 3 tbsp cornstarch
  • ½ C sugar
  • Splash of lemon juice

Equipment

  • A 9-inch pie pan
  • A rolling pin
  • Parchment paper

Instructions

  1. Take your frozen berries out of the freezer to allow them time to thaw and preheat your oven to 325 degrees.
  2. To make the dough: Combine all the dry ingredients and the butter in a medium-sized bowl until crumbly.
  3. Add the egg and vinegar. Mix until dough forms, making sure to scrape down mixer if the egg gets caught in the middle. If you’re using an electric mixer, the dough starts to form a ball on its own. If the mixture seems too dry to become dough, add a teaspoon of milk.
  4. Wet your hands before molding the dough into a ball and wrapping with plastic wrap, to prevent crumbling. Refrigerate for 20 minutes.
  5. To make your filling: Place the berries in a medium-sized bowl. Add your cornstarch, sugar, and a small splash of lemon juice to the berries and mix gently so that the berries are evenly coated. To keep the bottom crust from disintegrating too much, strain berries over another bowl for a few minutes before placing them the pie crust.
  6. Once your dough is chilled, divide it into two equal parts. Lightly spray two pieces of parchment paper with non-stick spray. Place one section of the dough between the two sheets and roll out using a rolling pin. If you’re not sure how big it should be, place the pie pan on top of the rolled out dough. You’re looking for an inch or two wider than the bottom of the pan, and it should be about ¼ inch thick.
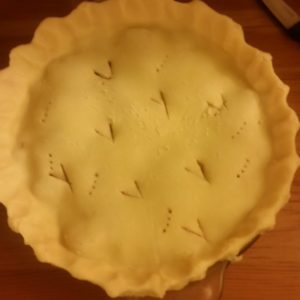
  7. Carefully peel off top piece of parchment paper. Take your time. Flip the rolled out dough (paper and all) into a pie pan. Carefully peel the second piece of parchment off. If you accidentally tear a hole, no sweat. Just take some extra dough from the edges and patch up the hole by pressing in the excess with your fingers. Prick the crust all over with a fork to help keep the crust in place during baking.
  8. Repeat the parchment paper process with the other half of the dough.
  9. Flip the second piece of dough onto the top of the pie and adjust the alignment so that it’s centered. Press the edges of the bottom and top crust together and crimp them evenly.
  10. Bake for 40 minutes and then cover with tinfoil to prevent over browning. Bake for an additional 20 minutes until the pie is solid most of the way through.

Gluten-free Pie Baking Tips:

  • For a non-dairy option, replace butter with Smart Balance or Earth Balance. If using Smart Balance, the colder the dough, the better. Try freezing the dough, and then work quickly.
  • If refrigerating or freezing the dough before use, microwave dough for 20-25 seconds to soften before rolling out.
  • If you’re in a hurry, and your kitchen isn’t sweltering hot, you can roll out the dough without refrigerating it. Just be very gentle when you roll it out and anticipate needing to patch some holes when you flip the dough into the pan.
  • If you are pre-baking or blind-baking the crust, bake for 15-20 minutes at 325 degrees. (Blind baking is not required for the recipe above.)
  • When adjusting your own pie recipes to gluten-free, if you are making any kind of fruit pie, toss the fruit with the sugar, cornstarch and any other dry ingredients, then let the fruit strain for 10 minutes. If you keep the excess liquid, the bottom crust will weaken and it will be difficult to get a whole slice out of the pan.

Alternative Topping

If you want to use the crust recipe to make two pies without top crusts, consider replacing them with streusel. Here’s a quick recipe for making a pretty good streusel substitute gluten-free:

Gluten-Free Streusel

Course Topping
Prep Time 10 minutes
Servings 2 people

Ingredients

  • 4 tbsp butter
  • ½ C white rice flour
  • ½ tsp baking powder
  • ¼ C packed brown sugar
  • 1 tsp vanilla
  • ¼ tsp xanthan gum
  • 2 tsp milk

Instructions

  1. Combine dry ingredients, butter, and vanilla in a medium-sized bowl until crumbly. Add milk and mix. If using an electric mixer, watch very carefully for the crumbs to begin to clump slightly and form larger crumbs. As soon as they do, turn off the mixer. Do not over mix or the crumbles will turn into balls of dough. In the event of over clumping, break the dough into small pieces by hand.
  2. Sprinkle over pies (or muffins!) One batch will cover 1 pie or 9 muffins.

Recipe Notes

When doubling this recipe, keep the measurements of wet ingredients the same to prevent over clumping.

Use this recipe to make fill your pie-craving after switching to gluten-free or make an extra special surprise for your gluten-free friend!

What’s your favorite kind of pie? Let me know in the comments.


How to Make a Holiday Feast for Two (Part 2)

Welcome to part 2 of my recipe series in which I teach you a collection of recipes for two people to cook and eat for the holidays. If you don’t have a big family to spend the occasion with or if crowds aren’t your thing, but you don’t want to miss out on the food, these recipes are for you! In this hub, you’ll learn how to make my own special version of cranberry sauce, green beans with bacon and shallots, and roasted yams. All three recipes are super easy and incredibly tasty. They’re also all gluten-free!

My Mom’s Cranberry Sauce

Every year. my parents and I went to visit a family out of town for the holidays, and since we were their guests, we rarely did much of the cooking. But the one dish my mother would bring every year was her special cranberry sauce. It was sour and bright tasting with a very slight crunch.

It wasn’t until I was a teenager that I realized my mom’s cranberry sauce was utterly different from the cranberry sauce the rest of the world was making and eating. Traditional cranberry sauce is cooked into something that resembles jam, whereas my mother’s sauce is raw, includes almonds and oranges, is served cold, and is similar to a chutney in texture.

When I moved away from home, I found myself regularly craving this cranberry sauce that no one else knew how to make. I got my mom to send me the recipe and I was surprised by how easy it was to make.

This is definitely one of those “about a handful of this and a dollop of that” recipes. I’ve approximated the amounts needed, but you should experiment with the taste and texture til you get a version you like. Try different types of citrus or nuts, make the sauce chunkier or more liquidy, sour or sweet. I’m curious about the difference in flavor if you blanch or toast the almonds first. You get to choose!

Mom's Cranberry Sauce

Summary: A cold version of traditional cranberry sauce including crunchy almonds for texture.
Course Side Dish
Prep Time 15 minutes
Servings 8 people

Ingredients

  • 12- oz cranberries one standard-sized package
  • 1 large seedless orange
  • C almonds
  • 1-2 tsp almond extract
  • 1-2 tbsp sugar
  • 1/2 C apple juice

Equipment

  • A blender or food processor

Instructions

  1. Place just the almonds in the blender and chop them on their own.
  2. Add the full package of cranberries and blend again. If blending is difficult, add a little of the apple juice to get things moving.
  3. Peel the orange, removing as many of the white bits as you can. Place the individual segments in the blender along with the almond extract, and blend. Add more apple juice if the blending is slow.
  4. Here’s where the fun begins. Take a taste and see what you think. You will probably want to add some sugar and the rest of the apple juice at this point, but start with small amounts and work your way up.
  5. Adjust the sugar, almond extract, and apple juice until you get the flavor and texture you want. If it gets too sweet, you can add some lemon juice.
  6. Eat cold by itself or on top of turkey and enjoy!

I’d really love to hear from some folks who try this recipe since I’m the only one I know who makes it. How did you eat it? What additions did you try? Let me know in the comments!

Now on to our next recipe.

How to Make Green Beans with Bacon and Shallots

I’ve known for a while that I’m not very good at making green beans. I’d boil them for 10-15 minutes, drain them, and then serve them with butter and salt. They were passable but I knew there had to be a way to make them tastier.

Determined to improve my green-beans cooking technique, I stumbled on a recipe online that looked easy. I tried it and it’s one of the most delicious dishes I’ve ever made! It’s so simple, so yummy, and while the dish is cooked in bacon grease, the green beans are still very crunchy, meaning you’re getting way more nutrients out of them than if you steamed or boiled them to death.

This recipe also reheats surprisingly well. The flavor of the garlic and shallots are absorbed by the bacon grease, which coats the green beans, making leftovers extremely tasty 2-3 days later.

Sauteed Green Beans, Bacon and Shallots

Sauteed green beans with bacon and shallots.
Course Side Dish
Prep Time 10 minutes
Cook Time 20 minutes
Total Time 30 minutes
Servings 4 people

Ingredients

  • ¾ lb-1 lb of green beans
  • Ice
  • 2 slices of bacon sliced into tiny strips
  • 1 small shallot sliced
  • 1 large clove of garlic sliced
  • Salt and pepper

Instructions

  1. Trim the tops and bottoms of the green beans.
  2. In a large pot, boil water. Once boiling, salt the water as you would water for pasta so that the water tastes slightly salty. Only a little of the salt will be absorbed by the green beans so don’t worry if it seems to like a lot.
  3. Add the green beans to the boiling water, reduce the heat, and cover. Cook for 2 minutes.
  4. Take a large bowl and fill with ice and cold water. Once green beans have finished cooking, strain the green beans and place them in the ice water. Make sure the green beans are fully submerged and leave them to chill until they feel cold to touch.
  5. Heat a large frying pan over medium-high heat. Add the bacon and fry until the meat starts to turn brown and crispy. If there is more than a tablespoon or two of grease in the pan, pour out the excess grease.
  6. Add the shallots and the garlic to the pan and fry for about a minute.
  7. Add the green beans to the frying pan and cook until they are heated through. Add salt and pepper to taste. Don’t be afraid to grab a bean and try one for temperature and to adjust the seasoning!
  8. Serve and enjoy.

TIP: You can boil your green beans ahead of time and once they’ve cooled completely, you can keep them in the fridge or in the ice bath until it’s time to fry them.

If you want to make a vegetarian/pork-free version of this recipe, replace the bacon with 1 tbsp olive oil and 1 tbsp of melted butter, and increase the salt. Fry the garlic and shallot in the butter/oil mixture for several minutes, and then add the green beans, making sure they are thoroughly coated. The dish won’t be as intensely flavorful, but it will still make crisp, tasty green beans.

Next recipe!

How to Roast Yams

This recipe could not be simpler and it produces the most delicious, naturally sweet yams. I cook it every year at Thanksgiving, it takes five minutes of prep, and it’s incredible every time.

Roasted Yams

The simplest, easiest, tastiest ways to roast yams.
Course Side Dish
Prep Time 5 minutes
Cook Time 45 minutes
Total Time 50 minutes
Servings 4 people

Ingredients

  • 4-6 whole yams
  • ¼ C oil canola, vegetable, and coconut all work well
  • Butter for serving

Equipment

  • A baking sheet with a lip around the edge
  • Tin foil
  • A basting brush

Instructions

  1. Preheat the oven to 425 degrees F.
  2. Thoroughly cover your baking sheet with tinfoil. If you are worried about the surface of the baking sheet turning brown, use two layers.
  3. Line up your yams on the baking tray. Long thin yams with a smooth surface are the best for baking evenly all the way through. Prick them 6-8 times each with a fork or knife.
  4. Lightly brush your yams all over with a thin layer of oil. You’re not looking to douse them. You just want the oil to create a seal that keeps the moisture inside.
  5. Bake for 45 minutes.
  6. Cut them open and serve with butter or brown sugar for a really special treat. That’s it!

Recipe Notes

If liquid is burbling and popping out of and around your yams, that’s okay! That means it’s caramelizing and that’s a good thing. If you’re concerned about the oil reaching high temperatures in the oven, err on the side of less oil when you brush the yams.

How to Put It All Together

  • This post is just one part of the whole holiday feast. Check out the others too:
    Next up, I’ll teach you how to coordinate cooking 5-6 dishes at the same time with just two people, and be finished cooking in just a few hours!
  • Make sure to look at Part 1 if you missed it, which includes how to make turkey and stuffing for two, and mashed potatoes.
  • Here I show you how to make a classic Blackberry Pie, including my gluten-free pie crust recipe.